Platform Features Release: Additional Alert Functionality, Watch List Alerts, Info Button, Trade from Charts
Features Release Notes:
Additional Alert Capability, Set Watchlist Alerts, Alert Management Info Button, New Trade Button on Charts
Announcing: Expanded Alert Capabilities, Watchlist Alerts Information Button, Trade Function from Charts
We’ve increased Alert capabilities to give users more ability to identify trade entry, exit and management opportunities. An Info button (i) is added to on the Alert Management Page to assist/guide users on the criteria offered.
Set Alerts by Watchlist as well as individual symbol.
Trade functionality is available from the Charts, streamlining the process when you have an existing trade or staged trade. Where there are more than one position on the same symbol, you’ll be given the option of what action to take.
Increased Alert Functionality
Set Alerts by Watchlist
You are able to set Alerts on your Personal Watchlists . There are 2 ways to do this:
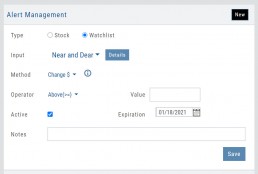
1. On the Watch Tab using the Alert Icon in the Icon bar
2. The Alert Management Page, click “Watchlist”, then select from the drop-down which will automatically populate available lists to choose from.
Criteria available for single stock/etf symbols are available to set for an entire watchlist, include Real Time, up to 6 month activation and the ability to add Notes.
Clicking the “Detail” button will display the symbols contained in the selected Watchlist
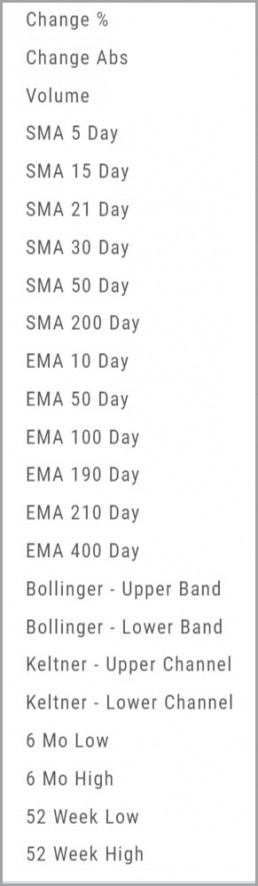
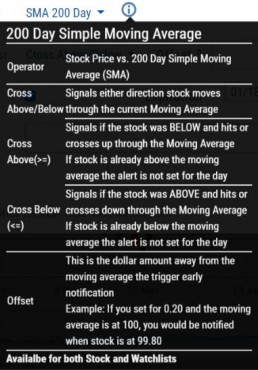
With the exception of Last Price, all Methods are available for both individual alerts as well as Watchlist Alerts.
Simple Moving Average
Exponential Moving Average
Bollinger Bands
Keltner Channels
6 Month Hi/Low
52 Week Hi/Low
As you see, SMA & EMA offer numerous time periods. The shorter the time period, the more alerts you will receive – especially when set on Watchlists.
Note: The Active Alert box on the left side of the Alert Management page will have ‘wl‘ indicated when the alert is on a Watchlist.
A Reminder on Alerts:
Alerts are RealTime if you have Streaming Quotes on the platform – OR – have a linked brokerage account that provides RealTime quotes to the platform – AND – have logged into that account in the last 30 days.
Alerts on OTC stocks will be delayed
Make sure to enable “Push Notifications” on your computer as well as mobile devices (if you have the app downloaded). You do not have to be logged into the platform to receive alerts as long as you have these notices activated.
Information Button – Alert Management Page
An Information Button has been added to the Alert Management page.
Located next to the Method drop-down, (i) clicking on this button will display in-depth information on criteria available to set your alerts.

Trade from Charts (Live, Virtual, Manual or Staged Orders)
Submitting existing trades or staged orders is streamlined.
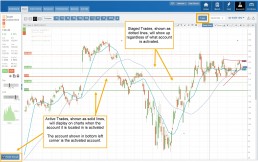
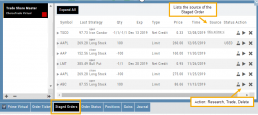
In the example chart above, there are two staged orders and a Live Trade.
Clicking “Trade“, located above the stock chart , will display a menu of an existing trade(s) in the activated trade account.
Staged Orders, on the same symbol, will display regardless of the trade account activated.
Staged orders will be shown in bold/black.
Active trades, whether Live, Virtual or Manual will be shown lighter/blue.
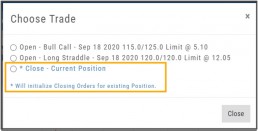
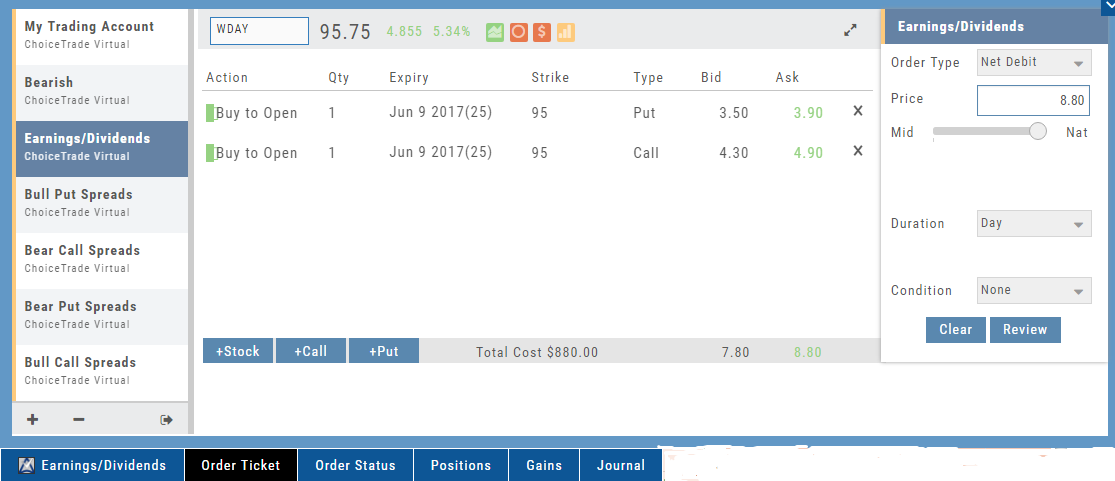
To the right is what displays after clicking “Trade”:
1. Open (Enter) the Bull Call Position
2. Open (Enter) the Straddle Position
3. Close the existing Active Trade (Manual, Virtual or Live)
The next action will take you to the Order Ticket to continue the trade process, as usual.
Change Log
- Ability to save Backtested trades after Market hours restored
- Dividend display corrected
- Adjusted links in BZ news
- Mobile App – scrolling issue resolved in Scans
Premium Features Release: Custom Home Page & Alert Functionality
Features Release Notes:
Custom Home Page, Alert Capability
Announcing: New Powerful Premium Features Added to the Trade Tool Trading Platform
Two new features, exclusive to the premium desktop version of the trading platform have been designed and implemented to help you make better trading decisions and have more control in managing existing trades.
Custom is located in the redesigned former Market Tab and gives you control of features you want to see in one customizable location.
Alerts gives you more control of your trading by setting up notifications set by your criteria.
Both features allow for expansion on future releases.
Custom Home Page
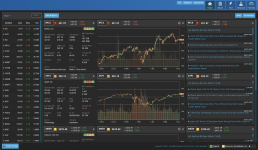
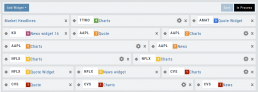
You now have a Custom Home page!
Located in the “Home” Tab (formerly Market), this is a flexible feature which allows for a convenient way to research trades or find opportunities – in one place – all defined by you.
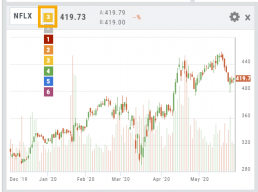
Start by adding Widgets: Chart, Quote and News pertaining to the stock, and even Market News The platform system will automatically adjust according to the available space on your desktop/laptop.
Each symbol can have multiple Chart set-ups – each with their own time period, chart type and indicators.
Want to rearrange the widgets? Custom allows you to do so.
Want to keep the settings, but change the selected stocks quickly? That’s covered too.
Alert Functionality
Alert capability gives you more control of managing existing trades or being notified of possible trade opportunities. Set by Last Price, $ or % Change, % Offset or Volume.
Receive triggered alerts on your computer and/or mobile device (with the mobile app).
Alert Management, located in Research, allows for easy modifying or removing active alerts from your current list.
Increase your profitability while minimizing risk on existing trades with this powerful feature!
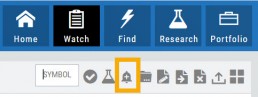
Alerts are easily set up from the Research Dashboard.
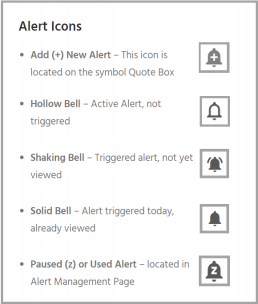
Click on the bell icon, located in the Quote Box,
Complete each field
Click “Save”
Quotes are RealTime if you have Streaming Quotes on the platform – OR – have a linked brokerage account that provides RealTime quotes to the platform – AND – have logged into that account in the last 30 days.

Change Log
- Researching Staged Orders resolved
- Adjustments/Building trades in Order Ticket issues corrected
- Deleting Snapshot trade in chain corrected
- Research/Dashboard/EPS data aligned
- Scroll bar improvement on PCs in Journal, Watch Lists
- Corrected “Position/Order Display” on Charts
- “Existing Positions” label displays on Charts
- Earnings display corrected when adding 10,30,60,90 periods
- TDA – History data updated
- TDA – Login resolved for Android mobile & Google Pixel
Order Staging (Premium Desktop Feature)
This feature allows the user to save Potential Trades for further consideration to decide the best ones to submit.
Staging is also useful when the Market is closed – to be reviewed when the Market is open to determine if it’s still a high-probability trade.
With one click, you can send to the Research Tab, Move to an Order Ticket or Delete and move on to the next staged order.
When Trade Sharing is enabled, Trades made in accounts you are following will be displayed in your Order Staging Tab. The Source will indicate the Account Name. Status of “Used” will display for those trades you submit on one of your accounts.
Expired Staged Orders will automatically be removed.
Set Up Trade & Journal Sharing (Premium Desktop Feature)
Trade and Journal Sharing
Step 1:
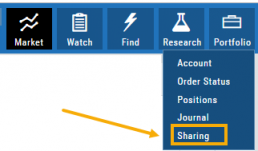
Select “Sharing” under the Portfolio Tab to to access these features of sharing trade ideas with peers or trading groups or have access to an Instructor’s Trades or Journal History.
Trade Sharing allows for potential trades to display in “Order Staging” listing the Source of the Order.
Journal Sharing can be used to follow a Trading Group, Instructors, Peer, Public Accounts as well as Newsletters/Trading Room applications.
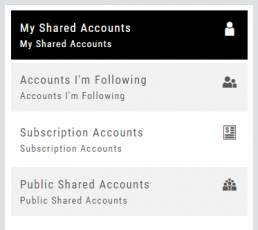
Step 2: On the left-hand panel, click on “My Shared Accounts”
Shared Accounts are grouped into 4 categories:
- My Shared Accounts – Elect to share Order Staging and/or Journal Sharing
- Accounts I’m Following – Other peers, trading partners, instructors
- Subscription Accounts – Newsletter or Trading Group applications
- Public Shared Accounts – allows access to a Public Directory with performance metrics
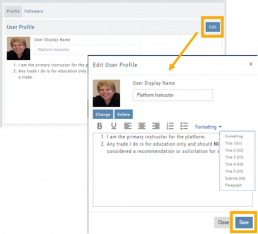
Step 3: Set up your User Profile
Click “Edit“
Add a User Display Name
Provide a Bio and/or Information about the account. This is what others will see.
The Formatting option allows you to customize the Bio/Information box.
Click “Save“
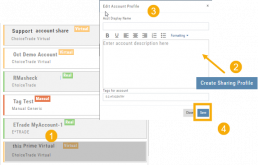
Step 4: Set Up Account Profile
1. In the middle panel, click on the Account to be shared
2. On the bottom right panel of the page, click on “Create Sharing Profile“
3. On the pop-up window, add an Account Display Name and Account Description.
Note: Both are required.
You are also able to add #tags to this Account Profile.
4. Click “Save“
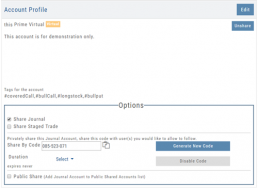
Available buttons allow you to Generate New Code and Disable Code.
Account Options
Once Shared, you can “Unshare” account by clicking on button located in the upper right of this box.
Share Journal is checked by default.
Check box for Share Staged Trades if you wish to provide that on the selected account.
A code is automatically generated to Privately Share/Peer-to-peer share
Duration drop-down menu allows you to set how long the code is valid:
Single use only
Hour
Day
Week
Until Disabled
Portfolio
Manage Your Portfolio from the Platform
With Brokerage Integration you can trade directly from the platform with select brokerage firms. Currently TD Ameritrade and Choice Trade are available. With more on the way.

Research
Narrow the field to find the highest probability trades.
Stock
You’ve narrowed the field by selecting potential candidates matching the outlook and selected strategy, but which of those have the highest probability of success? Research allows you to drill down for information as much or as little as you want.
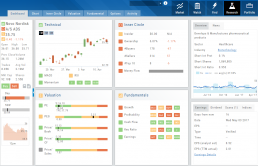
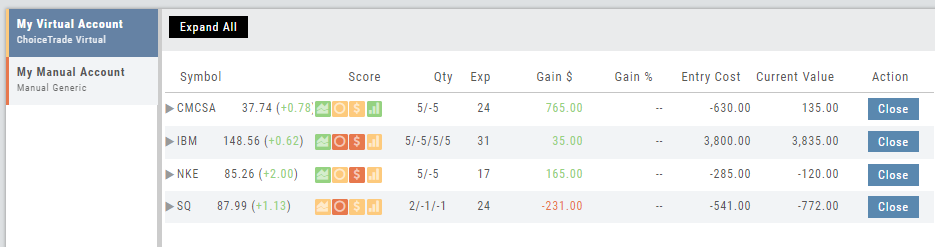
The Dashboard provides an overview: Quote Detail, The Score, Activity such as News/Earnings/Dividends and information about the Company and a list of other company stock symbols in the same industry. Each component has it’s own tab to provide more detail.

Components of The Score are designed to keep the information available to you, but out of the way when you don’t need it.
The Options Tab offers Strategy templates, option chains, snapshots and definitions of strategies, P/L Graph with Risk/Reward ratio, Analytics and Stock/Volatility charts.
The Activity Tab includes a Beta version of the Journal as well as News and StockTwits ®
Brokerage Access
Trade directly with select Brokers.
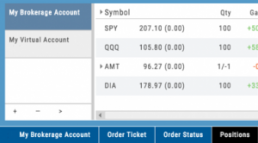
The Broker menu is located in the lower left corner of the screen and is always accessible. From here you can see your balance, positions, and orders.
There is also an integrated Order Ticket. This can be accessed directly or from any of the “Buy”, “Sell” or “Trade” buttons or from clicking on the Action Icon menu.


Order Types - How to Enter
Market Order are Buy or Sell orders to be executed immediately at current the Market Price. Execution of the trade is more important than price. As long as there is a willing buyer or seller, the trade will be executed.
Limit Orders (including Net Debit and Net Credit) allow you to set the Maximum Price to Buy or Minimum Price to Sell a security . Because these orders have ‘limits’ they may not be executed. When they are, they will be executed at the Limit Price – or better.
Low Volume, a slow or very fast market may mean your Limit Price may not be reached and thus, your order not executed.
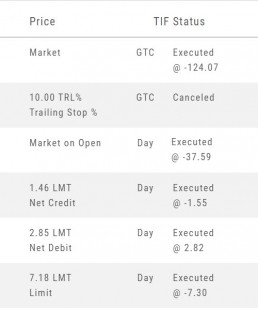
Stop & Stop Limit Orders
These are protective orders, to be placed on a current position.
A Stop Order becomes a Market Order when the Stop Price is reached. This does not mean you will get the Stop Price when the Order executes. You are willing to Buy/Sell at any price once your Price is reached to have the Order execute.
A Stop Limit Order generally offers more protection: Once the Stop Price is reached, the order converts to a Limit Order to execute once that price – or better- is reached. Thus, there are two values to enter on the Order Ticket for Stop Limit Orders.
How to enter a Stop Order/Stop Limit Order:
On the Positions tab, click “Close” for the Stock/ETF entry you want to add a Stop/Stop Limit Order to. You’ll be navigated to the Order Ticket tab to continue.
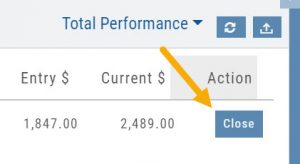
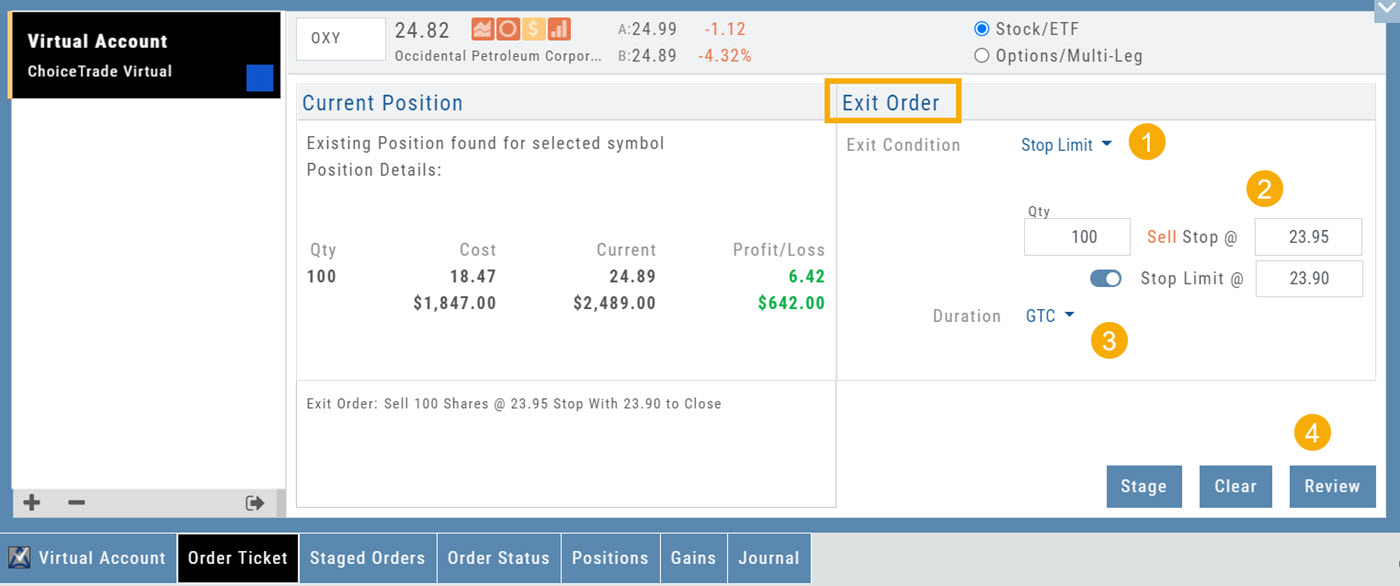
On the right side of the Order Ticket (Exit Order):
1. Change Exit Condition from default “Limit” to “Stop” or “Stop Limit“
2. Enter Stop Price. For Stop Limit Orders, the Stop Price will be the higher of the two values.
Enter Limit Price, if applicable.
3. Change Duration from Day (default) to GTC (which may vary by brokerage)
4. Review & Submit
Notes: As long as it’s not a Day order, the Stop/Stop Limit order will remain Live until you cancel the order or it executes*. (Some brokerages have expiration dates on such orders)
Trailing % and Trailing $
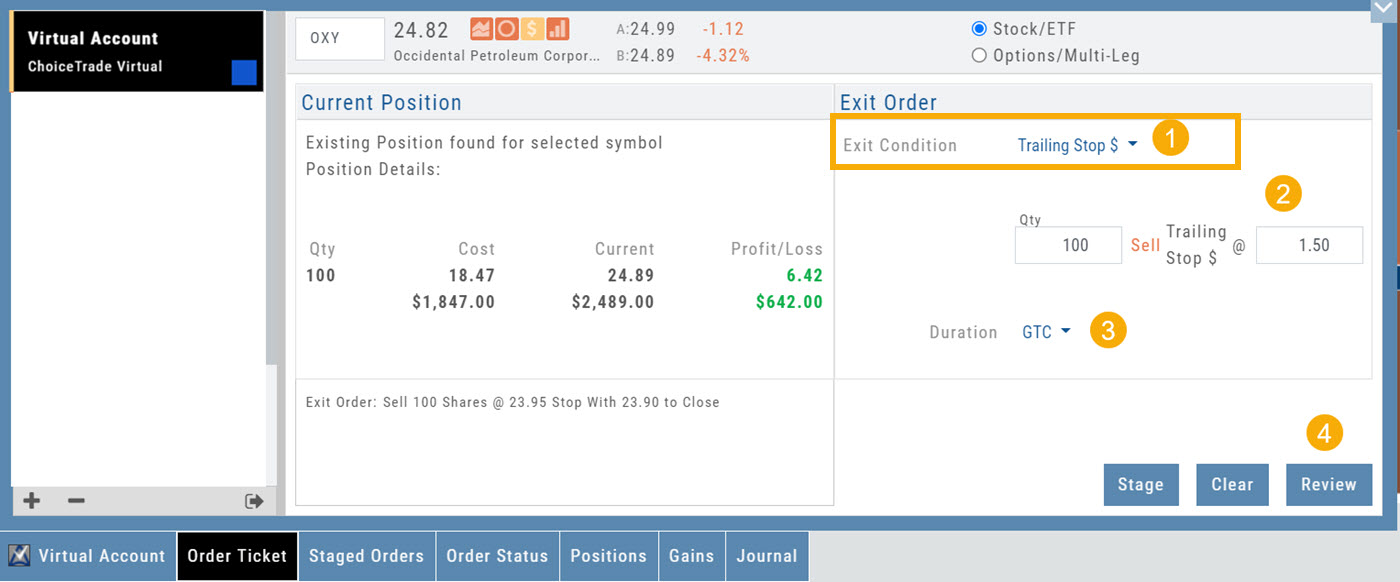
As the names suggest, these orders follow trades upward by a set $ or %. They are placed on a current position. Click “Close” from the Positions Tab, then follow the steps below:
1. Change Exit Condition to “Trailing % (or $)“
2. Enter price or percentage to exit trade
3. Select Duration (Day/GTC)
4. Review, then Submit
This will be a Live Order until it Executes, Expires or is Cancelled.
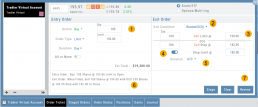
Bracket Order – One Cancels the Other (OCO)
- Opening Order OR the existing Position to Close
- Select “Bracket (OCO)”
- If the trade is favorable, the Limit Price will trigger to close and secure profit.
- If the trade is unfavorable, this Stop (or Stop Limit) Order can limit your loss
- Duration: “Day” or “Good Til Canceled”
- Summary of the Bracket-OCO Order
- Review for accuracy, then Submit on the next screen
Access Trading Account Information
No need to login to Brokerage Account site for normal day-to-day activity.
Each account includes a Summary page showing the Account Balance, Margin Balance, Stock, Option & Day Trading Buying Power and tracks the current trading day’s activity.
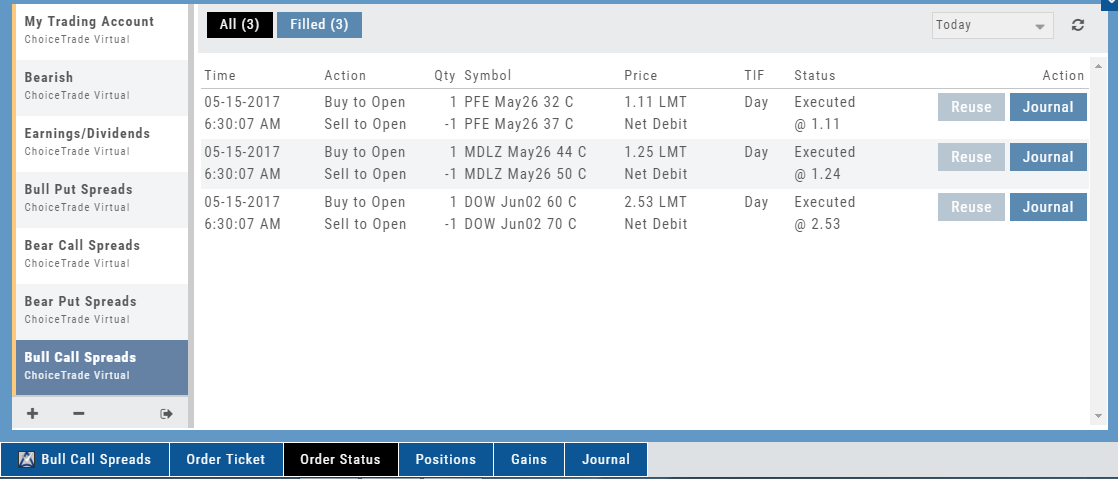
Besides the Order Ticket, the Order Status, Current Positions & Transaction History are all available. You can view previous order history in the Order Status tab by clicking on the drop-down menu on the upper-right corner of that screen.
You can access any account and switch accounts with a single click. You can even change the account from the order ticket.
The newest feature, Journal provides the means of organizing, noting, analyzing & reconciling trades.
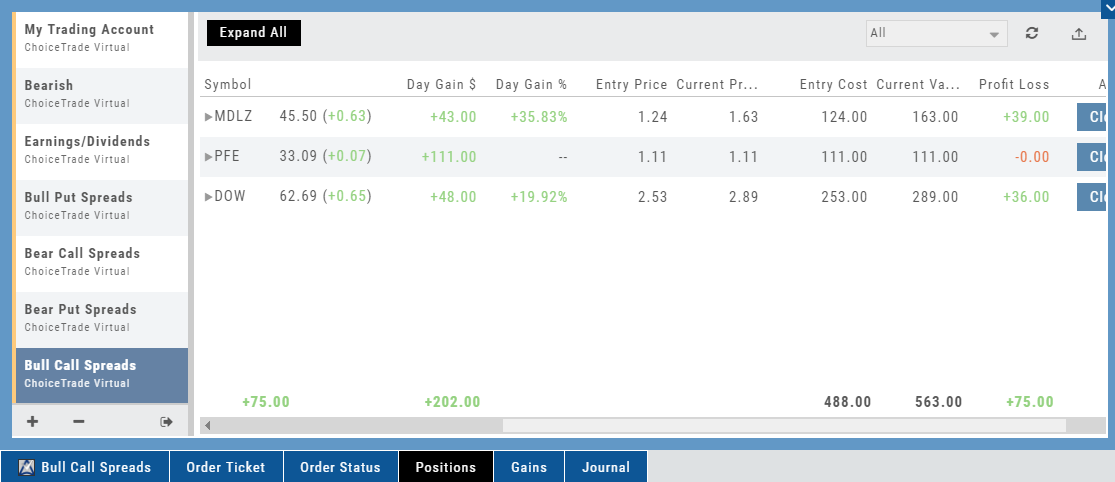
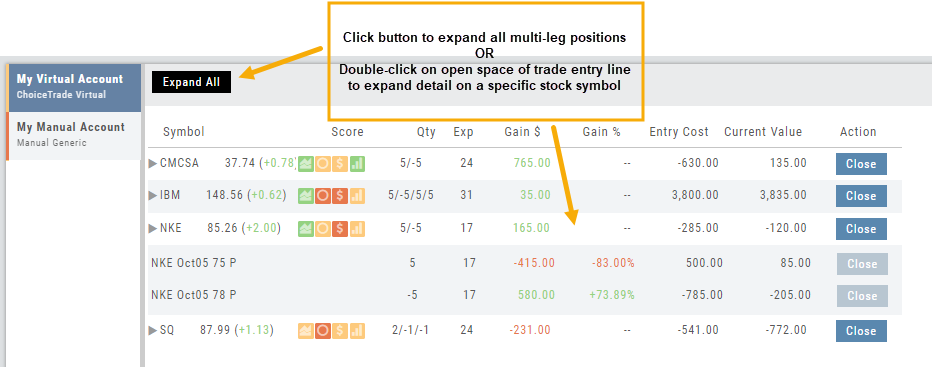
Expand Trade Detail - Positions Tab
There are 3 ways to expand multi-leg trades in the Positions Tab.
Smart Icon – Click on the ![]() icon to the left of the stock symbol, select ‘Expand/Collapse’. Repeat to close.
icon to the left of the stock symbol, select ‘Expand/Collapse’. Repeat to close.
Expand All – Click the button above the trade entries if you wish to expand all multi-leg trades. Once clicked, the button will change to Collapse All.
Double-Click – if you want to expand one trade or specific trades, simply ‘double-click’ on an open space of the trade entry line. Repeat to close.